|
Publisher: Big Fish Games Developer: Big Fish Games Release Year: 2008
Travel to the Amazon Jungle to find a lost explorer who is on the road to discovering the whereabouts of the legendary Beetle Temple. One of the most popular games in the Hidden Expedition series, Amazon is known for its symphonic soundtrack and challenging puzzles. It is far more "oldschool" than many recent hidden object games, but its scoring system, beetle subquest, and slightly randomized item lists provide some decent replay value.


Type: Object Repair/Music Puzzle
Comment: Put the keys from your inventory into the proper slots on this Egyptian mask. Just use trial and error since it's almost impossible to tell which goes where. This thing is actually a fancy musical instrument.

Next, take the two pieces of paper off the wall to reveal a series of hieroglyphics that are identical to those on the mask. Click those keys on the mask in the sequences shown to open a secret compartment.

Type: Snake Charming Puzzle
Comment: Each of these baskets contains a snake holding a maraca in its tail. The goal here is to get all three snakes to dance to a song in unison, but certain conditions must be met. First, the snakes must be coaxed out of the baskets to a specific height, as designated by the colored lines on the wall behind them and the color of their maracas. Click Oswald until his head is at the yellow line. Click Fabiano until he reaches the green line. Click Ringo until he's at the magenta line at the very top. Next, the snakes must each be given an instrument that they like the best. Give Oswald the accordion, Fabiano the purple flute, and Ringo the drum. Finally, set the tempo of the metronome one click to the right of 12:00, and the puzzle is solved. Here's a screenshot for referencing the instruments and metronome setting.

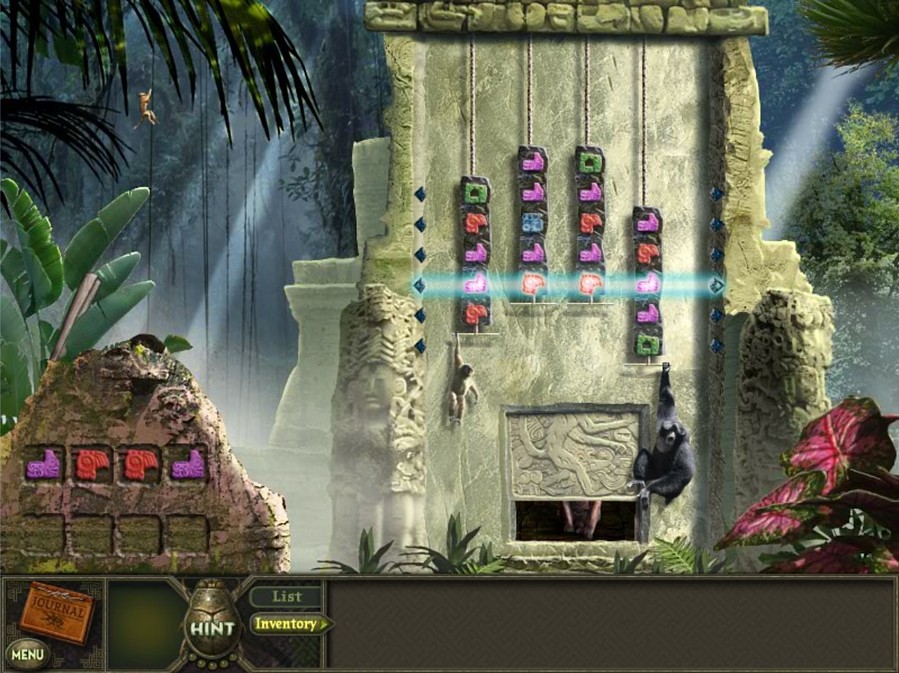
Type: Pattern Matching
Comment: Welcome to this game's first real pain in the ass puzzle. The goal here is to get the set of shapes in the grid that are lit up to match those on the bottom left of the screen. The shapes on the lighted line can be shifted by clicking the arrows at the end. However, to succeed here, you will also need to make use of the monkeys. You can drag and drop the monkeys onto the grid and they will pull the column down. How far it goes down depends on their size. The big monkey takes it down 3 spaces, the medium monkey pulls it down 2 spaces, and the small monkey 1 space. You can put up to 2 monkeys on a column if necessary. You will need to use a combination of moving the shapes with the arrows and pulling them down with the monkeys to duplicate the pattern the game wants.
Two unfortunate things to note here - first, this puzzle is generated randomly, so I cannot give an exact solution for it. But the first two are rather easy to solve since you only have one line of shapes to deal with. Here are a couple of examples of solutions for the first two: (Figure 1) (Figure 2). The second unfortunate thing is that once you solve them, the game does this to you:

Now you have two rows of lit shapes to manipulate. One tactic that works relatively well is to pull columns down with the monkeys, then shift the shapes over left or right to get the correct ones in the line and the wrong ones out. A lot of luck and practice will get you through this.

Type: Electric Bar Puzzle
Comment: To begin this puzzle, replace the broken light bulb at the top with one from your inventory and also use your oil can on the funnel. Your inventory will fill with bars of different lengths. You must light up every bulb at the top by placing the bars on the electric rods. To illuminate a bulb, the ends of the bars have to touch one blue and one gold rod. All rods must get a bar, and a rod cannot have more than one bar attached to it. If you need help solving this puzzle, here is the solution.

Type: Match Object to Picture/Simon Says
Comment: There are a bunch of gems hidden around this scene that must be placed in the indents on this large rock. (Some of the gems are hidden behind things, but you can see the faint glow of their color. Click on the objects to reveal them.) The torn note shows you how to place the gems near the top of the star. I think the way the rest go in is randomized, but you'll know if you placed a gem in the correct node by the sound it makes. Incorrect = click sound; Correct = soft thud sound.

When you have all the gems in their proper places, a rope will drop down from the ceiling. Pull on it, and the gems will light up and play a tune in a specific order. You must then click the gems in the same order, and if you do it right, a part of a star will be drawn between the gems. Keep going until the entire star is drawn. This part is definitely random, so I can't give an exact solution. Write down the pattern on a piece of paper if you have to. Note that if you make a mistake, you'll be given a different random sequence to mimic.

Type: Leapfrog Puzzle
Comment: This is a multi-part puzzle to open the entrance of the Beetle Temple. It begins with three purple beetles in green rectangles, and three green beetles in purple rectangles. You need to swap these guys so all the green are in green and all the purple in purple. Click a beetle to move it to an empty space. The beetles can leap over one another so long as there is a space for them to land on. This is a lot more simple to accomplish than I'm making it sound.

Type: Hidden Object
Comment: The second part of this puzzle is really just a disguised hidden object scene. See those hollow shapes at the top? Find and click on those shapes in the area below.

Type: Match Object to Picture
Comment: The third part is similar to the second. You must find the same shapes that appear on the stone face in the area around it. However, they must all be turned so that they match the way they look on the face. My screenshot shows the first one solved. Here is the entire puzzle solved.

Type: Match Object to Picture
Comment: For the final part, there's a giant cat head statue whose facial features can be changed by clicking on the posts in front of it. The goal is that you must match its features exactly to each of the two statues sitting to the left and right of the door. Here is what it looks like matched to the left statue. Here is what it looks like matched to the right statue.

Type: Object Removal/Rotating Picture Puzzle
Comment: There are three locks on this strange underwater statue. You have to free them by first clicking on one of the gold removable tabs underneath to give it room to drop down. Then click the release bars to make it drop down. The topmost one only has one of each part to click, but the others have multiple parts. Start from the top on both.

When you've released all the locks, the statue's parts will rotate around and form a random jumbled mess. Click them to rotate them and form one complete statue image of a man holding a beetle.

Now a set of three rotating parts appears at the bottom. Click them to form the image of a squid. The beetle will glow. Click it to open it. Here is what it looks like solved.

Type: Shape Matching
Comment: Eventually, you'll come to this door in the temple that's marked with animal shapes and probably be hella confused what to do. A note in the room provides a clue - you must go back to the previous areas and search for these same animal symbols on the walls.

In this room, you can find the bird and the dragonfly. When you click on them, they light up and a wall panel slides open. The panel then starts cycling through random shapes. Most of the shapes are red herrings. The only ones you need to worry about are the triangles because they correspond the same areas on the door that the animal shapes occupy. Set the bird to the right triangle, and the dragonfly to the triangle that's pointing down. Note that this can be solved through trial and error. If you set the shape correctly, then check the door, the area with that animal shape will be lit up. If it's not, you don't have the right shape selected.

In this room, click on the frog and set the shape to the triangle shown in the screenshot.

On the screen with the gears, click the butterfly and the snake and set their shapes to the triangles shown in the screenshot.

On this screen, click the dolphin and set the shape to the triangle that's pointing up.

If you did everything right, when you return to the door, all the animal shapes should be lit up. Find the brick on the righthand wall that has five indents in it and click on it. The door will open up to the next puzzle.

Type: Gear Puzzle
Comment: After all that work, believe it or not, there's still more to do to get this door open. You're now presented with a bunch of gears and empty pegs. There are two keys hanging near the top on both sides here. Drag them down and fit them into the matching slots at the bottom.

The keys will open the compartments and a bunch of gears will spill out. Fit them onto the pegs so that they all interlock. When you're done, grab the crank below the beetle and spin it until the doors open. Here is what it looks like solved.

Type: Pipe Connecting Puzzle
Comment: The goal here is to connect the pipe at the top left that has the valve to the pipe at the bottom left below it. You have an infinite amount of elbow pipes that you can pull from the pile in the top left. The straight pipes in the playing field can be moved by clicking the green arrows. You do not need to connect to every pipe in the field - some might just need to be moved out of the way. Here is what it looks like solved.

Type: Light Switch Puzzle
Comment: There are a bunch of electric beetles in this room with different symbols written on them. When you plug them into the four sockets on the central platform, they will make some of the lights turn on, but not all of them. The goal is to find the right combination of four beetles that will turn on every single light. This can be one of the most difficult puzzles in the game and from what I understand, the beetles are randomized. Here is what it looked like when I solved it on this run, but you might have a different set of symbols for your solution.

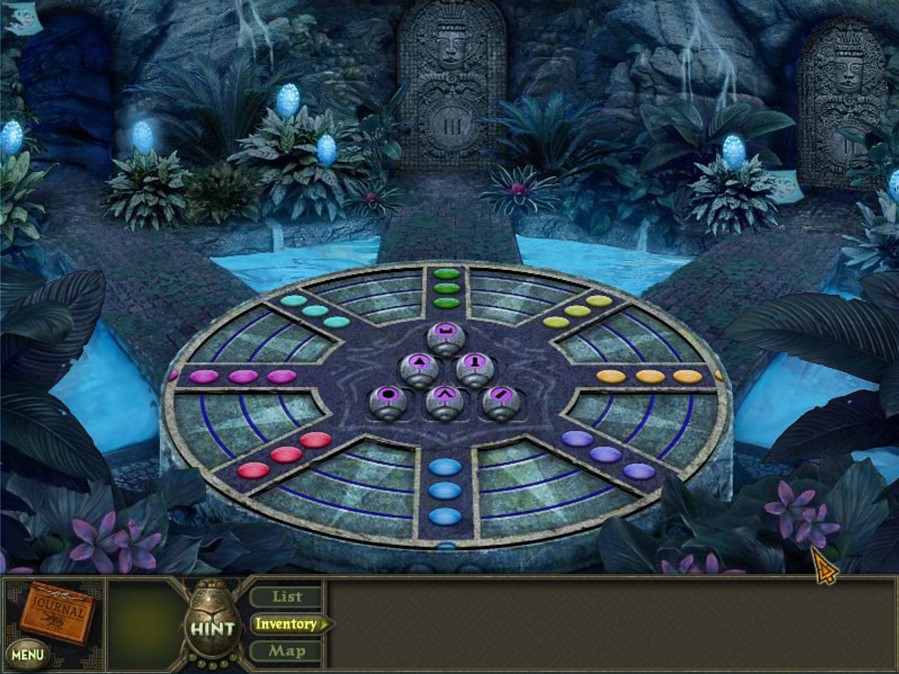
Type: Color Matching
Comment: When you leave the room and come back, you'll find another puzzle in place of the previous one. When you put the electric beetles in the sockets, they move the colored lights on the platform clockwise a certain number of times, depending on their symbols.

Click the paper near the door to see how the colored lights have to line up. They must match to this sheet. You only really need to concentrate on one set of colors, and it's easiest if you focus on getting the blue lights to the bottom middle spoke. The beetle that goes in the top socket will have to be one that moves the lights just enough times to put the blue where it belongs. The second row of sockets will need two beetles whose total number of movements bring the middle blue light around. The final row of sockets is the trickiest because all three beetles must add up in such a way that the final blue light will settle in its proper resting place.
While it is technically possible to get the lights to line up correctly without using all the sockets, the game will not accept it as a valid answer to the puzzle. All sockets must be filled with electric beetles to win. Keep in mind that for the one that requires three beetles, you can send the blue light all the way around more than once, so long as where it finally stops is on the bottom spoke. Like before, the beetles are supposedly randomized. This was my solution, but yours might be different.

Type: Pattern Matching
Comment: Leave the room and come back and a third and final puzzle will be in the earlier one's place. This one is complicated to explain, but is actually the easiest one to solve of the three. The puzzle will constantly cycle through the four sockets, and when a socket is lit up, a certain pattern of lights will animate on the platform. Four of the electric beetles will create a light pattern that matches to the four patterns the sockets display. So, for example, when you find a beetle that creates the same pattern that appears when the first socket is lit up, you'll want to plug it into that socket. When you have all four matched up correctly, the final door will open. Here was my solution for this run, but yours might be different since the beetles are randomized.

Type: Tetris Blocks/Symbol Matching
Comment: Start by clicking on the beetle and spider on these guys' heads. That will make the wooden plates slide down. Now find and click all the "Tetris" blocks hidden around the screen.

Both statues will already have one Tetris block in place on their wooden frames. You need to use the remaining blocks to completely fill the squares. You will know if you placed a block on the correct statue because its eyes will light up blue (see screenshot) and it will make an "Erru!" sound. If you place a block on the wrong statue, its eyes will light up red and it will make a much more hostile-sounding growl. Note that this only tells you if you've put it on the correct statue, not that you necessarily have it in the right spot on that statue. Here is what this part looks like solved.

Now the wooden plates come back up and the goal is to match the symbols on the rotating wheel in the middle to the symbols on the Tetris blocks that are showing through the holes. You can click on the wheel itself to rotate it, or the knob in the middle to completely change the symbol pattern. This is a lot easier than the previous part, and it's the final puzzle in the game. I solved the statue on the left in this screenshot. Here is the other one solved.
|


