|
Publisher: Viva Media Developer: MagicIndie Release Year: 2014
Jane Lockwood inherits her parents' old house and discover it's a gateway to Nearwood, a magical fantasy world where time has stopped and an evil presence that looks like the Smoke Monster from Lost is wreaking havoc. With the help of a gnome named Fey, Jane must restore the flow of time, defeat the monster, and discover the secret behind her parents' disappearance. Nearwood is a very gorgeously hand-drawn hidden object game, but despite its child-friendly looks, it has some rather devious puzzles.


Type: Pipe Connecting Puzzle
Comment: You need to create a spear by connecting the pathways in such a way that the molten lava on the upper left and the water on the upper right can travel down to the spear mold below and combine. The lava will travel along the grey stone tiles and the water along the brown wooden tiles. Tiles of the same type can be swapped to form the paths, except any tiles that are nailed down cannot be moved. There may be more than one possible way to do this.
Here is a solution for the lava.
Here is a solution for the water
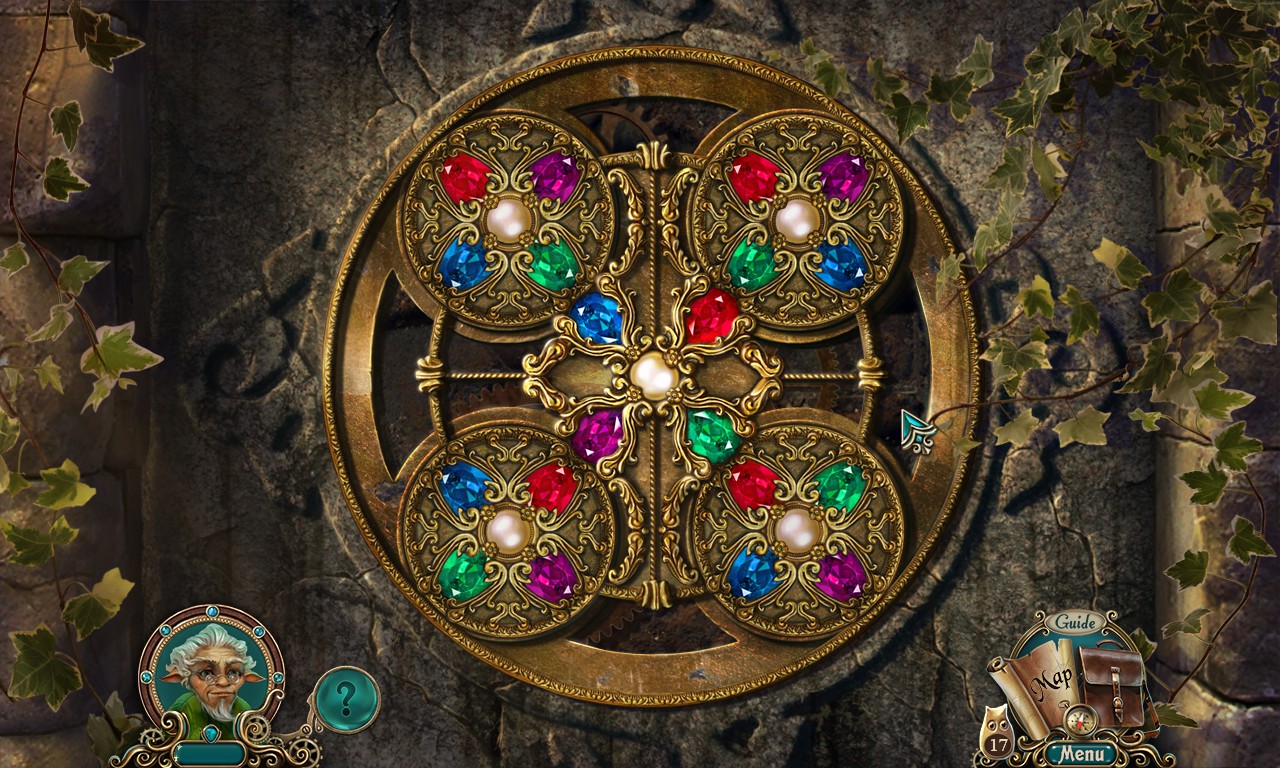
Type: Color Matching Wheels
Comment: Rotate the wheels so that the colored gems match the gems in the center of the lock. Turning some wheels will affect others. Here is what it looks like solved.

Type: Spoke Puzzle
Comment: When you move a spoke, the spoke with the same colored gem will move with it, like a pair of clock handles. The idea is to arrange all the spokes so that none are overlapping. There are multiple possible end results, but here is how I solved it.
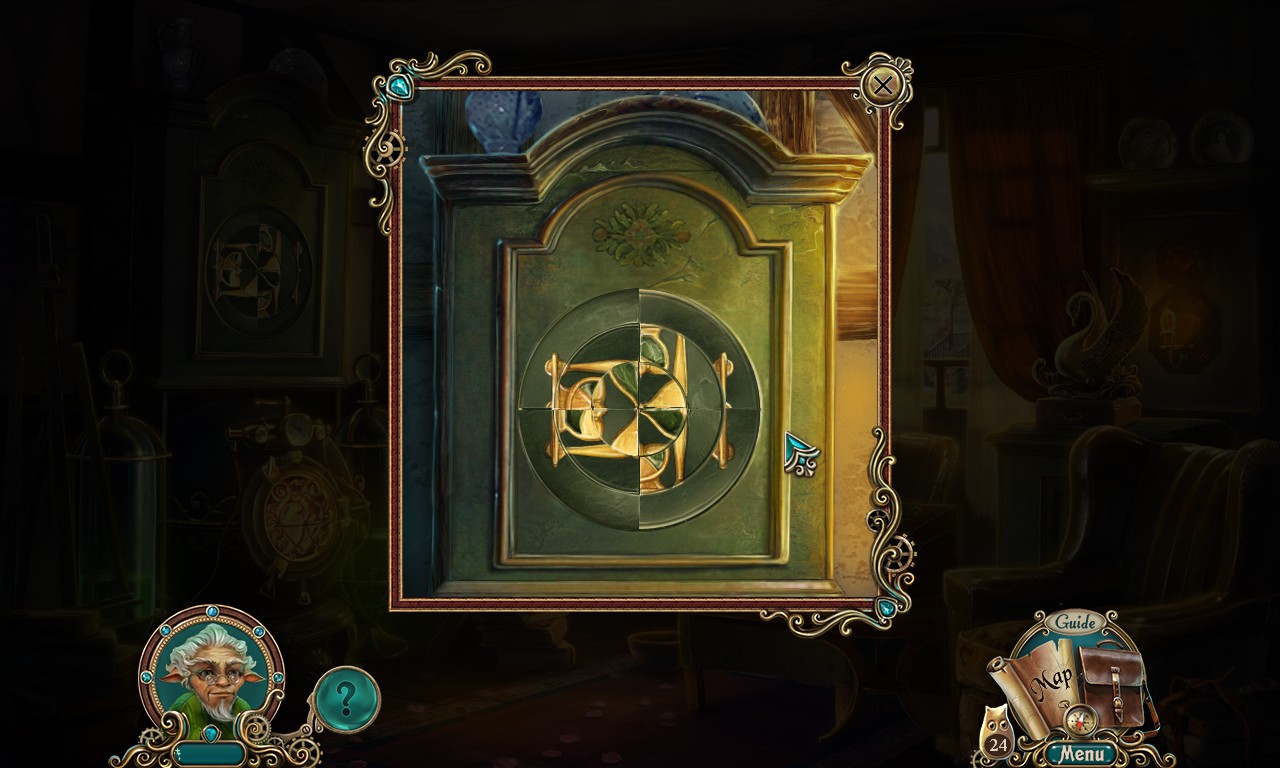
Type: Swapping Tile Puzzle
Comment: Swap the tiles to form the image of an hourglass. Here is what it looks like solved.

Type: Sliding Tile/Node Puzzle
Comment: This is a rather devious puzzle for a child-friendly game. You must get the star to visit every section of the maze, but it can only visit them once, and when you move it in any direction, it doesn't stop until it hits a wall or a node it's already visited. This can only be accomplished from one particular starting point. I will walk you through it in the following screenshots:

Start by placing it in the node in my screenshot. As far as I know, it's the only one that will allow you to solve the puzzle.

Move the star down, left, up, right, down. It will stop at the node it already visited.

Now go right. It will slide all the way to the wall.

Go down, then left.

Go up. It will stop again where it already drew a line.

Now just go right, then down and you've solved it.

Type: Story Sequence
Comment: Move the drawings from the top of this machine to the bottom, but make sure to place them in chronological order. Here it is solved.

Type: Tetris Blocks
Comment: Arrange the flower beds snugly in the garden. Plots of the same color cannot be adjacent. There are multiple ways to solve this, but here is my solution.

Type: Symbol Matching
Comment: Put the buttons in the correct sections by matching their images to the seasons. The correct answers are as follows:
Winter (Upper Left): Christmas Tree, Sled, Snowman, Stocking, Wreath
Spring (Upper Right): Bird, Flower, Rabbit, Sprout, Tree Buds
Summer (Lower Right): Butterfly, Goggles, Hat, Shoe, Watermelon
Fall (Lower Left): Acorn, Grapes, Leaf, Pumpkin, Umbrella
Here is a picture of it solved.

Type: Chess Puzzle
Comment: All you have to do is move the chess pieces to the squares on the board that have the same colored circle they do. They only move as they would in a real chess game. Here it is solved.

Type: Rolling Tile Puzzle
Comment: I'm going to be honest with you - these are my new most hated type of hidden object game puzzle, and I'm rather surprised one was included in such a child-friendly game. I guess that's what the skip button is for. These are even worse than sliding tile puzzles in my experience, because sliding tiles are annoying, but at least I can usually solve them in enough time. I don't think I've ever solved a rolling tile puzzle without looking up a guide. There must be something I'm not doing right or missing, but I can never get them on my own. And this one's particularly nasty because the image is so abstract, it's not clear what you're trying to piece together. I normally wouldn't do this because I like figuring out my own solutions to HOG puzzles, but this one was frustrating me too much, so here's the game's Strategy Guide answer. And here is what it looks like solved.

Type: Rotating Maze
Comment: After that last one, they give you an easy one. Just rotate the maze to guide the tiny silver ball to the exit, like so.

Type: Pattern Matching via Rotating Parts
Comment: You need to get the glowing lines on the wheels to form a triangle, but the only way to turn them is by adding or removing weights. Redistribute weights amongst the wheels until they line up properly. There might be more than one way to solve this, but here is my solution.

Type: Mahjong
Comment: The kangaroo/squirrel creature wants you to play a game of Mahjong for its key. Click two matching stones to remove them from the field. Stones that are blocked by other stones cannot be removed until they're unblocked. Keep going until all stones are gone.

Type: Color Mixing Puzzle
Comment: Use the different colored berries (that look like tomatoes) to create paint. The bells on the wall will light up with the color it currently wants.

Start by adding a single red to make red, a single blue to make blue, and a single yellow to make yellow paint.

Now the game will ask for colors that require a mix of two berries. Orange = Red + Yellow. Green = Yellow + Blue. Purple = Blue + Red. Put both colors in the juicer at once to make them.

Type: Math Equalizer Puzzle
Comment: The power must be charged to the indicated lines by pressing the numbered buttons. Changing one side affects the other. I noticed the game's strategy guide had a solution for this puzzle, but mine was different. I was able to get it by clicking both 7's, then both 5's, then both 3's. Here it is solved.

Type: Fishing Mini-Game
Comment: Drag the hook to the clock hand at the bottom of the pond, avoiding the fish along the way.

You don't have to wait for a complete opening. The fish can safely pass through the line. It's just the hook you don't want them to touch.

Type: Jigsaw Puzzle
Comment: Put together the broken pieces of the lens. You'll need to complete the job with grass glue, so come back with it later if you don't have it. Here is what it looks like solved.

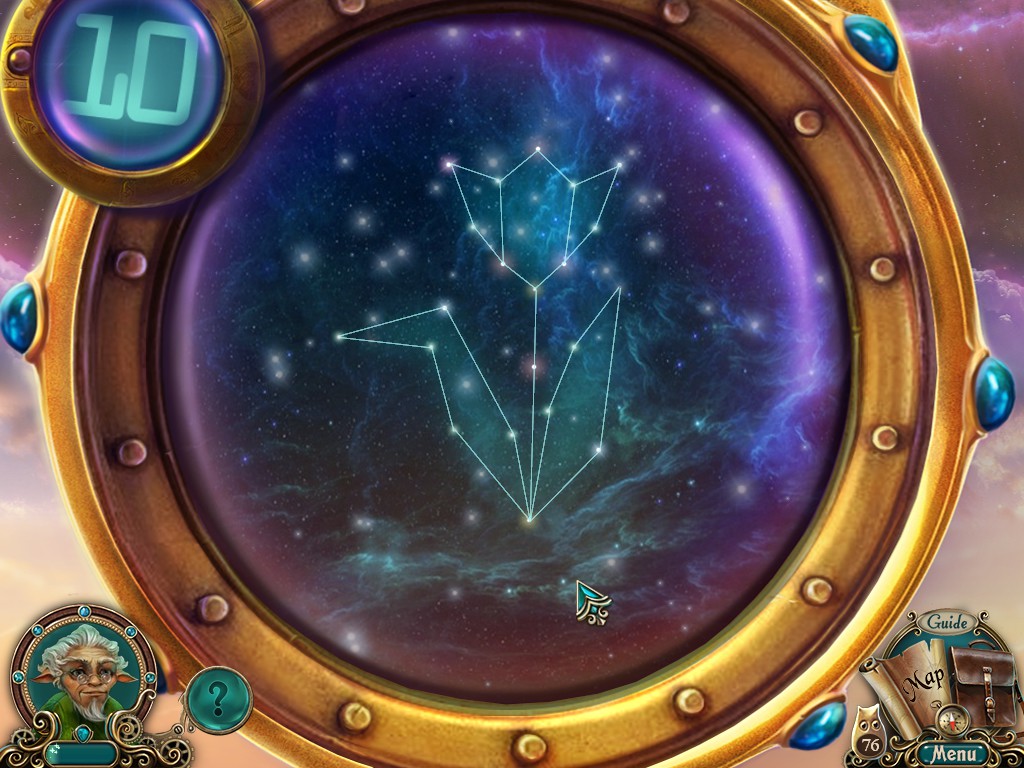
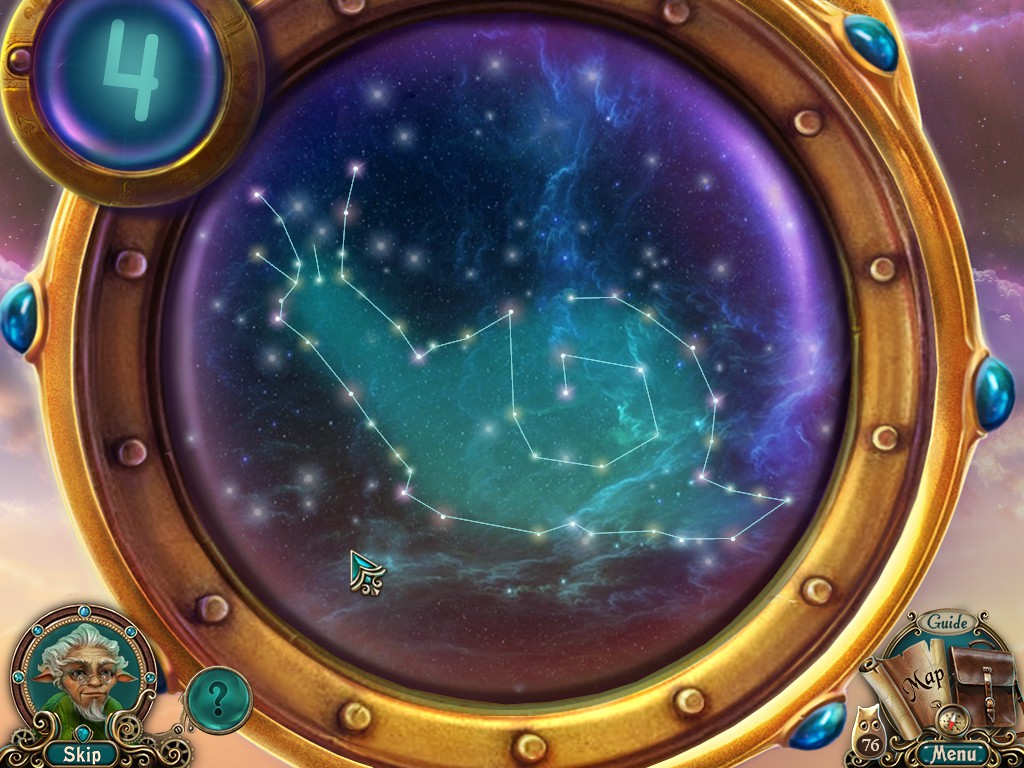
Type: Optical Illusion
Comment: You can rotate the constellations in the telescope, and from one certain angle they will appear as a recognizable object. There are 10 of these altogether. Here are their solutions:
#1: Flower

#2: Fish

#3: Butterfly
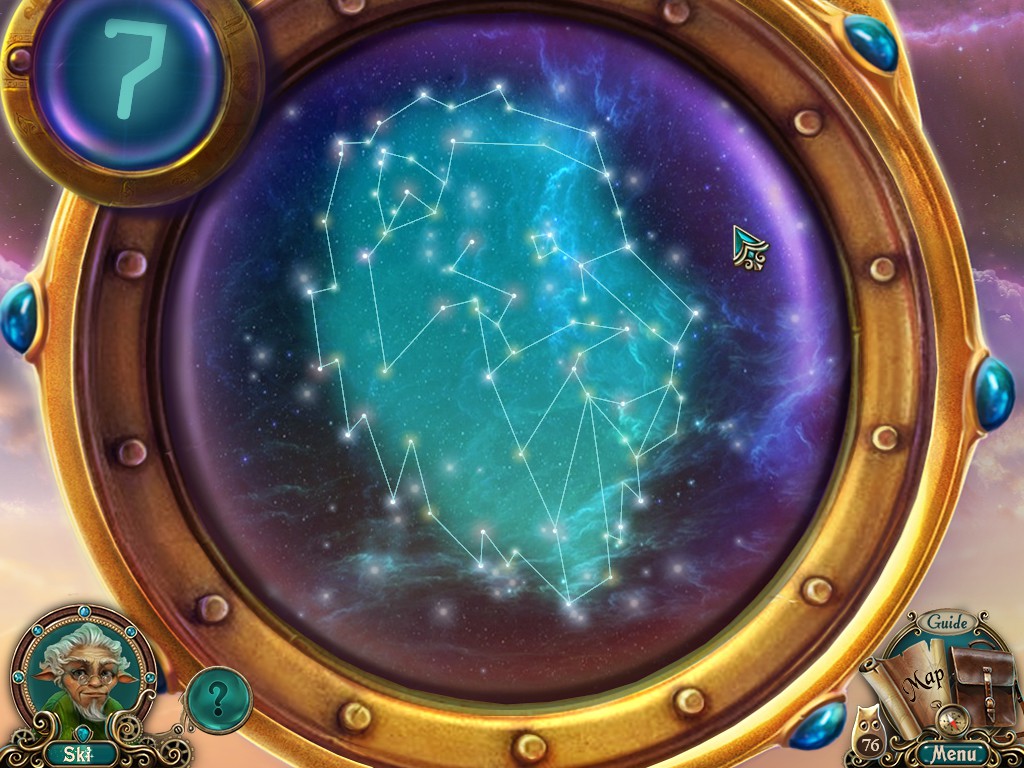
#4: Lion

#5: Unicorn

#6: Cat
#7: Snail

#8: Bull

#9: Goat
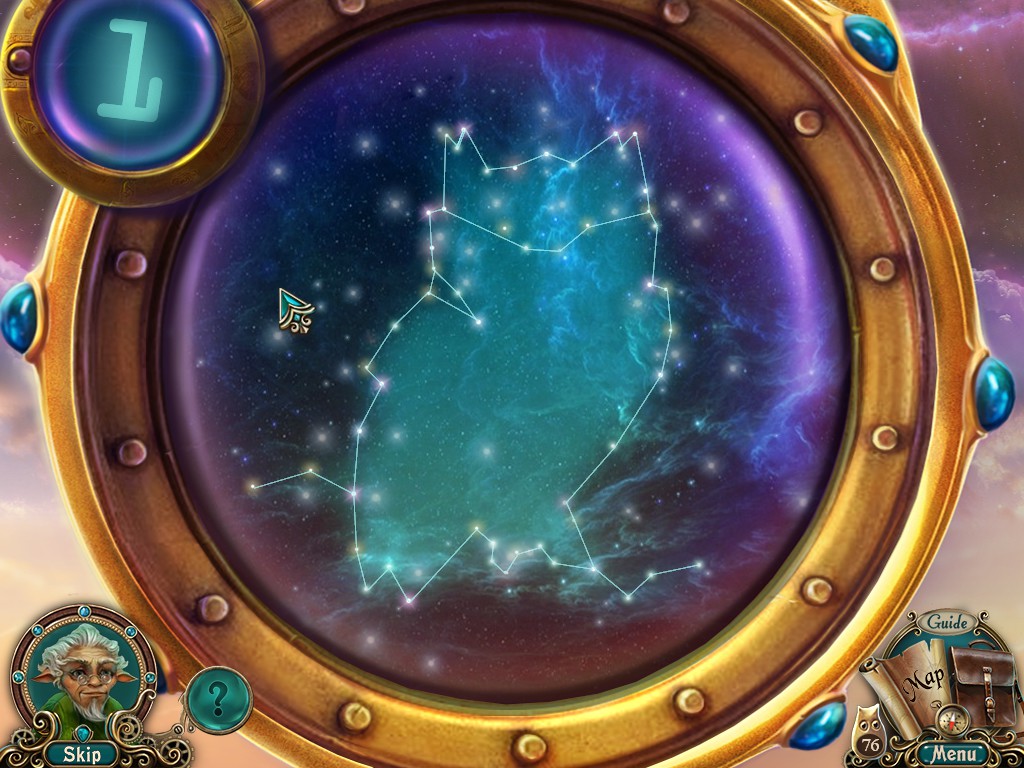
#10: Owl

Type: Cat's Cradle
Comment: One of the most complicated Cat's Cradle puzzles I've seen, the vines must be untangled and removed from the doors. Here it is solved.

Type: Bookshelf Puzzle
Comment: Arrange the books so that the spine images form two monsters facing each other. Here it is solved.

Type: Simon Says
Comment: In the main game's final showdown, you will need to play a game of "Simon Says" with your magical staff to beat the monster. I thought it was possible this is randomized, but I looked at the guide and the solutions match up to what I wrote down, so here they are:
Round 1: Red, Blue
Round 2: Orange Yellow
Round 3: Purple, Blue, Green
Round 4: Red, Cyan, Orange, Yellow
Round 5: Orange, Purple, Green, Blue, Red
Round 6: Blue, Red, Orange, Cyan, Yellow, Purple
Round 7: Cyan, Purple, Green, Orange, Blue, Red, Yellow
While this seems like a boss fight, if you make a mistake, you just have to do the current sequence over again until you get it right.

Type: Sudoku Lite
Comment: For the first puzzle of the bonus chapter, arrange all the hats so that no two hats of the same color or type are adjacent. The way I solved this was to think of it as a Sudoku puzzle. I made sure not to put any two hats of the same color or type in a column (I did not worry about rows). Doing it this way, it will eventually work itself out. Obviously, there are numerous possible end results, but here is my solution.

Type: Tandem Object Movement
Comment: Pressing a button will move both ships simultaneously. You must get them both to the bottom of the screen to the matching indents facing the lighthouse.

There isn't much to this except when you get the white ship to the bottom, you'll want to lodge the gold ship in this space so you can move the white ship forward without causing the gold ship to back up away from the lighthouse. This is what it will look like when it's done.

Type: Color Matching via Rotating Parts
Comment: This is another really devious puzzle for a child-friendly game. You must connect the same-colored lights by rotating the tiles to form lines between them. One trick to know that comes in very handy for solving this puzzle is that you will use every single line that's available. So, if you're having trouble figuring out a connection, and there are lines that aren't being used, you'll have to adjust things until they are. Here is what it looks like solved.

Type: Color Matching via Rotating Parts
Comment: For this puzzle, all the adjacent sides of the diamonds must be the same color. Clicking the ones with the button in the middle will rotate the diamonds around it. Clicking the diamonds themselves will rotate them individually, although the only ones you need to do this for are the ones with multiple colors. Because the ones with buttons cannot be moved, all the blue will need to be on the left and all the green on the right. The multi-colored diamonds should be rotated to the middle with the blue facing left, the green facing right, and the magenta facing up and down since there are no magenta diamonds. Here is what it looks like solved.

Type: Match 3
Comment: Unlike the earlier battle with the smoke monster, the final showdown of the bonus chapter is more like a true boss fight. You have a life meter and it's actually possible to lose, although the battle will simply restart again from the beginning. What you want to do is swap two adjacent colored pieces in an attempt to make a match of three or more of the same color in a row. When you do, the Fixie of the same color you matched will attack the boss with magic and the barrier that holds it captive will lose some of its energy. If you match the same color enough times, the Fixie will be released. You need to release all six of them to win.
However, if you make a move without matching three or more, you will lose some of your own health meter. Because of the random nature of this mini-game, it's almost impossible to win without taking some sacrifice hits. You won't always be able to make a match and may have to move a piece over closer to where it can be matched.
My suggestion is to clear out any from the lower part of the puzzle field first, if possible. The colors that appear and where they appear is so random, that I have sometimes won this without much trouble, and other times only just barely. Good luck, the bonus chapter will be completed when you finally win.
|


