|
Publisher: Artifex Mundi Developer: Artifex Mundi Release Year: 2014
The sequel to the excellent hidden object game, Grim Legends: The Forsaken Bride, Song of the Dark Swan is based partially on the Grimm fairytale, The Six Swans. While I still prefer the first game in the series to this one, Grim Legends 2 showcases a distinct watercolor art style and a bonus chapter with a menacing dragon.


Type: Concoction/The Bucket Problem
Comment: The very first puzzle is a common HOG "concoct a potion" type of puzzle that also happens to include the infamous "Bucket Problem", which would be familiar to anyone who's seen Die Hard 3. Get ready for a long explanation. First of all, check the nearby instructions to see what you have to do. Start by putting down your pitcher of blue water, then uses the matches and candle to light up the burner.

The liquid measurement isn't actually denoted here, so I'll pretend it's milliliters (ML) for the purposes of this explanation. Start by filling the 5 cup with the green liquid.

Pour the 5 cup into the 3 cup. This leaves you with 2ML in the 5 cup. 2ML is what you need, so pour the 5 cup into the cauldron. Dump the 3 cup down the drain.

Next, fill the 5 cup with the blue water.

Pour the 5 cup into the 3 cup.

Dump the 3 cup down the drain.

Pour the 5 cup into the 3 cup. You now have 2ML in the 3 cup.

Fill the 5 cup with blue water again.

Pour the 5 cup into the 3 cup. This leaves you with 4ML in the 5 cup.

4ML is what you need, but you have to add some herbs to it first, per the instructions. When you're done, pour it into the cauldron.

Use the ladle to stir the cauldron, then use your chalice to get the potion. Congrats, you're finally done with this one.

Type: Color Linking Puzzle
Comment: Next, you'll be presented with three sets of gears that need to be linked to each other by color. The chains you draw between them cannot overlap. This is much easier than it sounds, but here are the solutions for all three of them: Puzzle 2A Solved; Puzzle 2B Solved; Puzzle 2C Solved.

Type: Color Matching Wheels
Comment: These are very common HOG puzzles. This one is fairly simple to solve. Here is the solution, but an achievement unlocked and blocked part of the picture. The top gem is green, the other two are purple and red.

Type: Dollhouse/Storybook Puzzle
Comment: Typically, all you have to do in these types of HOG puzzles is click the objects on the screen that advance the story. In this case, they're all mentioned in the dialogue. Start by clicking the swan and the eagle.

Next, click the cauldron, the scroll, and the amulet. I don't think it matters what order you click these objects in, so long as you get all of them.

Click either of the clouds, and one of the gnarled trees near the front of the scene, and one of the darker trees near the castle in the back.

Keep clicking on the people until they board the boat, take it across the river, and enter the other castle.

Click the Peacock Lady and you're done with this puzzle.

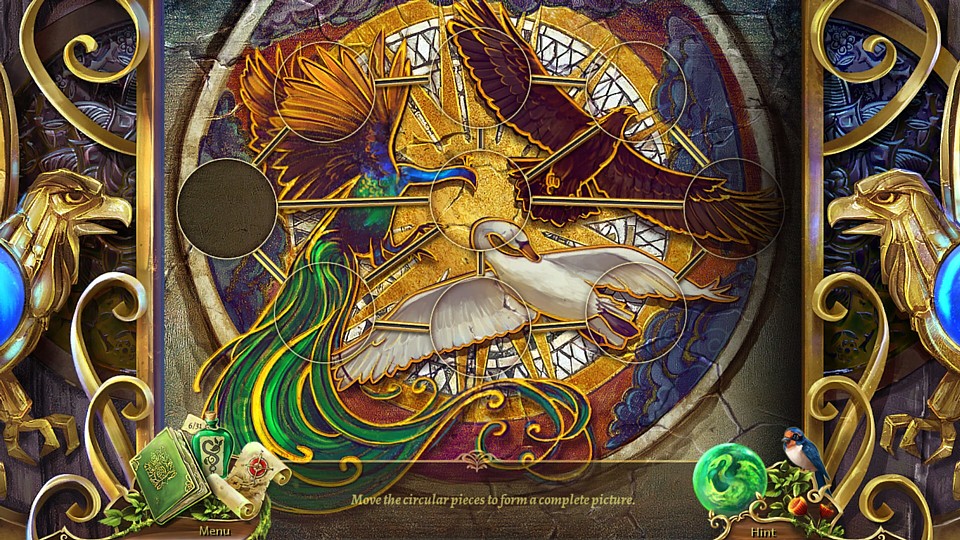
Type: Sliding Tile Node Variant
Comment: The tiles must be moved around the nodes until they form the complete picture of a peacock, swan, and eagle. Here is what it looks like solved.

Type: Combination Lock
Comment: This is not technically classified as a puzzle (no option to skip it), but I'll include it anyway. Match the symbols on the lock to those on the clue sheet. Here is what it looks like solved.

Type: Tile Flipping Puzzle
Comment: Clicking on a tile will allow you to flip its position with an adjacent tile. Do this to get the full image of a peacock. I personally think it's easiest if you start with the tail feathers. Here is what it looks like solved.

Type: Cat's Cradle
Comment: Free the otter by untangling the ropes. Here is what it looks like solved.

Type: Maze
Comment: All you have to do is move the princess through the maze to the hole. The correct path is along the bottom.

Type: Color Swapping via Rotating Parts
Comment: If you don't start this puzzle off correctly, you will never be able to solve it, so it's a good thing it has a reset button. It's easy if you know the answer, impossible if you don't. You want to try to get all the red beads on the left and all the purple beads on the right. The trick is that you must always swap two red and two purple on every rotation of the large inner circle. If you have any red or any purple left over at the end, you will not be able to move them to the correct side without moving pieces you don't want. Here's how to pull it off:

Click the left circle until these two purple beads are at the exits. Click the right circle until these two red beads are at the exits.

Start clicking the large inner circle until the red and purple beads have swapped places.

Now line these red and purple beads up and swap them.

Finally, line these ones up and swap them. Remember that you can hit reset if you make a mistake. When you're done, it will look like this.

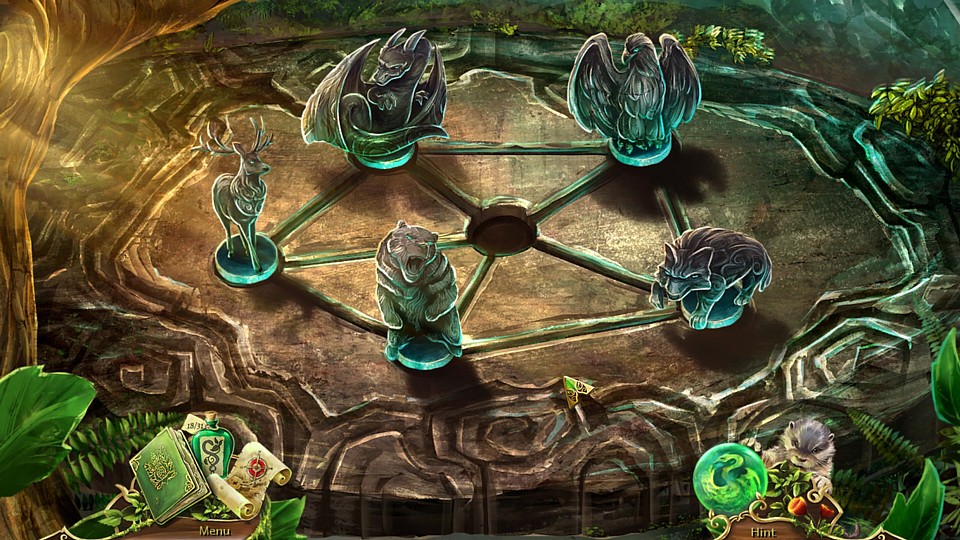
Type: Sliding Tile Node Variant
Comment: Each node except the center one has an animal footprint on it. You must move each animal figuirine to its correct footprint. This is actually a lot easier than the bird version of this puzzle you did earlier. Here is what it looks like solved.

Type: Color Wheel
Comment: The only difference between this puzzle and the dozens like it I've seen in other hidden object games is that this one reveals a picture when its complete rather than just changing colors. I mostly use the 2 to change the tiles, and the 3 to offset it, although apparently it can be done the other way around. Here is what it looks like solved.

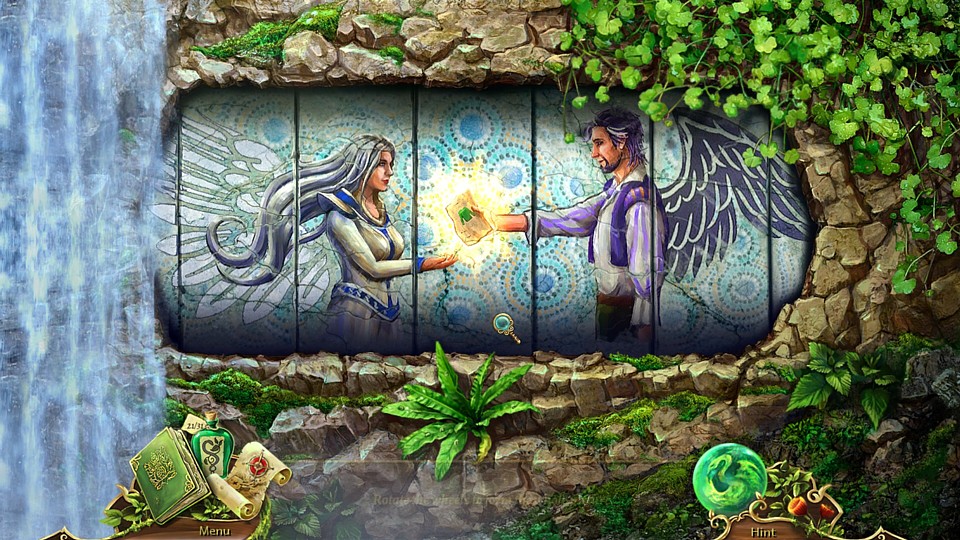
Type: Rotating Picture Puzzle
Comment: The first two parts of this puzzle aren't difficult. Just drag the pieces down or up until they form a full picture. Here is the first one solved.

Here is the second one solved.

Now, the third one is a colossal pain in the rear because it also acts like an On/Off Puzzle in that moving one piece will cause another piece to move with it. I really wish I had an exact solution to give you for it, but I don't. Only advice I have is that sometimes if you move the parts gradually and keep "fixing" the part that moved with it, you can work it into a full picture. It's a pain, you'll just have to keep at it. Here it is solved.

Type: Complete the Picture
Comment: This picture has missing pieces that have been removed from the "holes" and placed errantly around it. You must find them and drag and drop them in the correct places. For example, the flower on the mouses's head must be put in the flower-shaped hole in the first panel. Here is the what it looks like solved.

Type: Node Maze
Comment: You must move the princess around the maze so that she visits every node before reaching the end. A node cannot be visited more than once. Strangely enough, you have to visit all of them, not just the ones with the shirts.

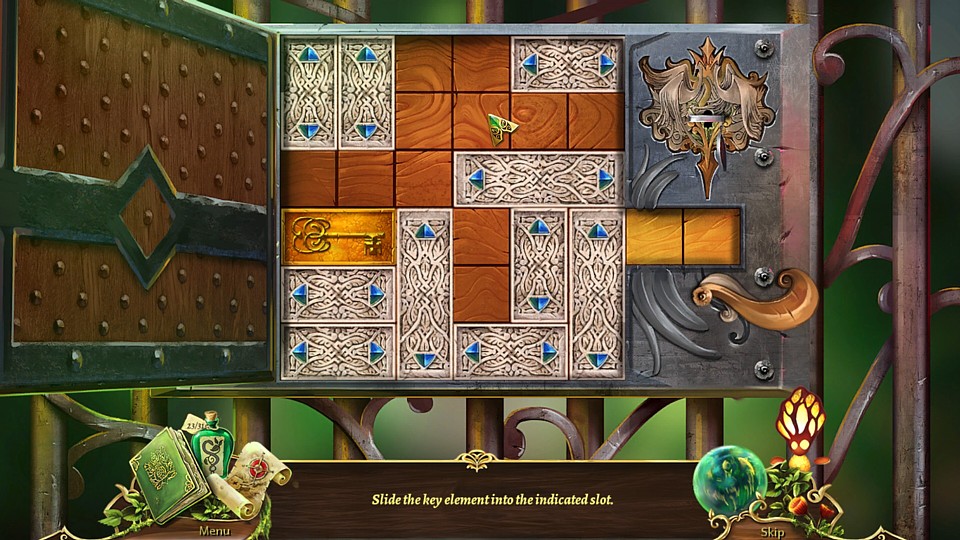
Type: Sliding Key
Comment: To solve this common HOG puzzle, you'll need to get the blocks out of the way so you can slide the key out. The trick to this one is that you'll need to move the key backwards before it can move forwards, so at about halfway solved it'll look like this. Here it is completely solved.

Type: Jigsaw Puzzle
Comment: Just a very easy jigsaw puzzle. Here is what is looks like solved.

Type: Correct Order/Sequence
Comment: A very easy puzzle that can be completed through trial and error. You have to click on the glasses in a certain order to make them resonate with the crystals, and ultimately cause the crystals blocking the passageway to explode. Do this three times to win. The solutions are: 1432, 3124, and 2431.

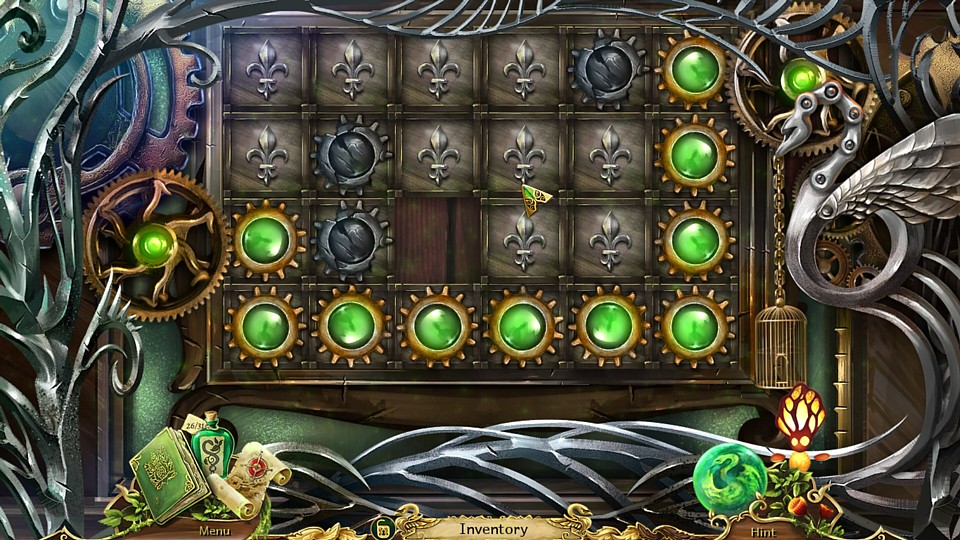
Type: Sliding Tile
Comment: A sliding tile puzzle with a unique twist - you have to line up the red gears so they form a chain between the big gear on the left and the big gear in the upper right. You cannot swap them with the broken gear tiles, they must be worked around them. There is more than one way to do this, but here is one solution that works.

Type: Screen Maze
Comment: Technically not a puzzle (no skip option), but I'll cover it anyway because of the frequency of screen mazes in hidden object games. If you take a wrong turn in this dungeon, you end up at a dead-end and will start from the beginning again. Your map has clues to the correct path. The first clue is a single picture of a swan. Only the door on the left has a single swan near it, so go left.

The next clue is two eagles. The door on the left has two eagles, so pull the lever to open it and go left again.

Next clue is two peacocks. Only the door on the right has two peacocks, so push the button on the wall to open it and go right.

Our clue is two swans, so go through the door on the right because the left door has three swans, and only the right has two. Note that sometimes the bird symbols are hidden behind moss, which can be removed by clicking it.

First of all, pick up the lever that's on the ground and attach it to the slot on the wall to the left. Pull it to open the doors. The final clue is one each peacock, swan, and eagle, and only the right door has all three of these symbols (note that the eagle is hidden behind the giant chain in the foreground and can be seen when it swings out of the way). Go through the right door and you're done the maze.

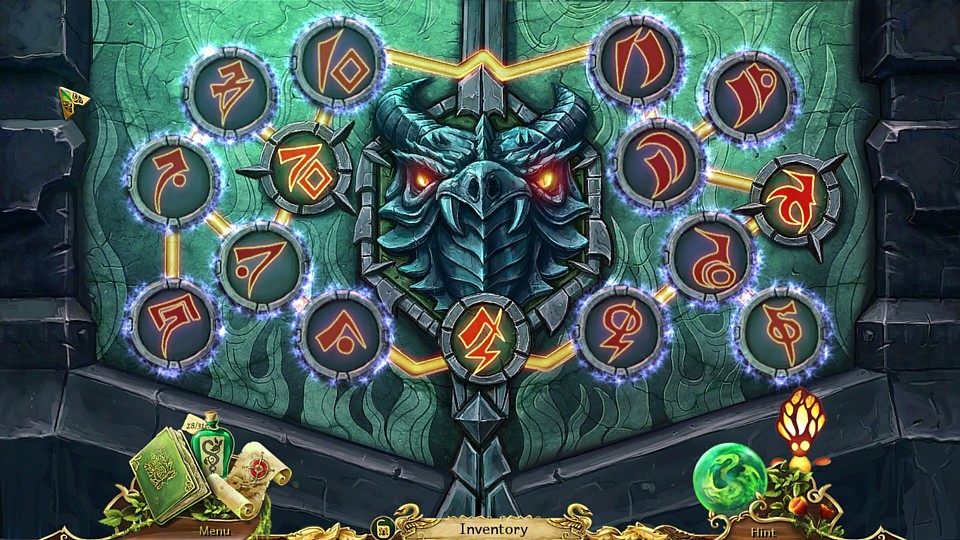
Type: Swapping Tile/Matching Shapes
Comment: Each rune of this puzzle has two shapes within it. The runes must be placed around the nodes in such a way that each adjacent rune shares one shape in common. The red runes are permanent and cannot be moved, so you can start by putting appropriate runes near them. Here it is completely solved.

Type: Concoction
Comment: Because your character is a healer, the game makes you do yet another one of these puzzles. You need to figure out what order to put the ingredients in the cauldron.

Start by looking at the instructions. "Process of elimination" is required to figure out the order. Because the directions are not complete, some guesswork is involved. Here's the correct solution:

Start with the red berries.

The mushrooms are second.

The pink juice is third.

The orange flowers are fourth.

The red lava is fifth.

The white flowers are last. You're done.

Type: Connect the Dots
Comment: All you have to do here is turn the tiles to eventually connect a line of dots from one castle to the other. There are multiple ways to solve this. Here is one possible answer.

Type: Rotating Rings Puzzle
Comment: You need to find a way to remove the spell here, and it is a bit cryptic. Here is the solution:

Start by rotating the rings so that all the red globes line up diagonally. Rotating one affects another. When you get them right, they vanish.

Next, to disperse the blue globes, simply click on the blue candles. That's it. Yeah, I think it's strange, too.

Type: Dollhouse/Storybook Puzzle
Comment: This is a heckuva lot more complicated than the earlier one. Prepare to stay awhile...

Start by grabbing the snail monster and dropping it in the cage.

Take the poison bottle and dump it in the queen's wine glass.

Find the two broken pieces of the heart and put them in place.

This makes the Peacock Lady appear. Find those eyeball things and put them on her sleeves.

Grab the torch that appears behind the dead queen and light it with the flame.

Hang it on the bracket near the door.

Grab the rope off the fence and connect it to the rope hanging by the torch.

Peacock Lady appears again. Take the sword from the guy outside the window and use it to cut the key off the vine.

Use the key in the keyhole to unlock the door.

The guy in purple walks in through the open door. Give the Peacock Lady's spellbook to him.

The clouds in the bottom area clear, revealing a house that is on fire. Take the bottle of water from the Peacock Lady's room and douse it.

Only half will go out, so use the vase from the dining room near the suit of armor to eliminate the rest.

When the king and queen show up, take the lily from the floor of the dining room and the lily from the Peacock Lady's window and give both flowers to them.

Return the king's helmet to the suit of armor.

A magic medallion appears in the suit of armor. Give it to the Peacock Lady. You are done with the main game's puzzles.

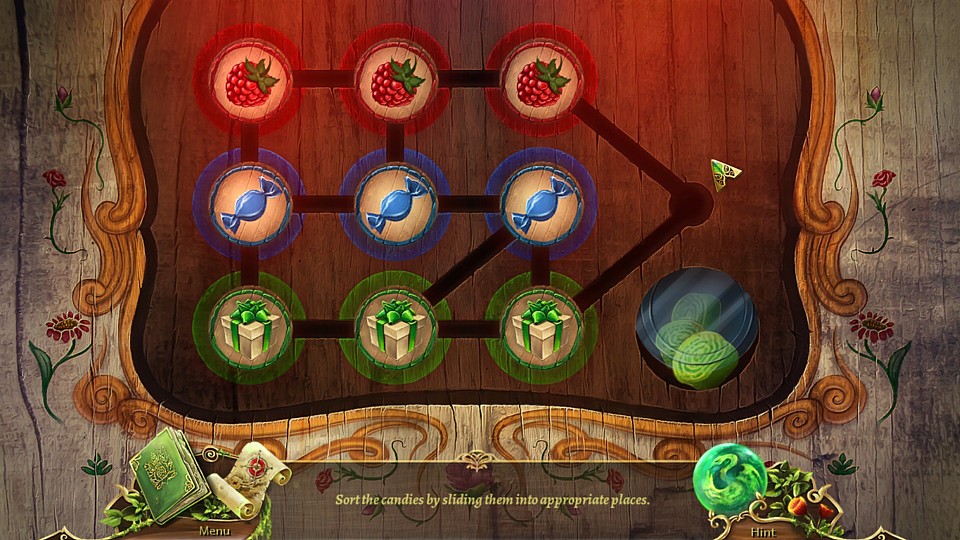
Type: Sliding Tile Node Variant
Comment: The first bonus chapter puzzle is another sliding tile on nodes. The three red berries must be moved to the three red nodes on top. The three blue candies must be moved to the three blue nodes in the middle. The three green gift boxes must be moved to the three green nodes on the bottom. Here is what it looks like solved.

Type: Tile Rotation Picture Puzzle
Comment: All you have to do here is rotate the tiles until they form a complete picture. Here is what it looks like solved.

Type: Light Beam Puzzle
Comment: Arrange the mirrors so they bounce the light beam into all three flowers. There might be more than one way to do it. Here is my solution.

Type: Sliding Key Puzzle
Comment: This somehow manages to be even easier than the one in the main game. Not sure why they did this puzzle twice. Here is what it looks like solved.

Type: Story Sequence
Comment: Click on the tiles to cycle them through four possible story scenes. Put them in logical order. The answers are:
Top Row: Lamb in the field; Lamb sees dragon; Lamb runs from dragon; Lamb hides in the tree trunk.
Middle Row: Fairy picks berries; Fairy gathers honey; Fairy stirs the cauldron; Fairy has a magic potion.
Bottom Row: Potion is poured into a cauldron; Dragon drinks the potion; Magical poof cloud; Dragon is a dragonfly. Here is the entire puzzle solved.

Type: Chess Puzzle
Comment: You must visit every tile of this puzzle with the knight, and he only moves in L-shapes, just like the knight chess figure. I don't have an exact solution, but it's easy if you just play around with it for awhile. You can revisit tiles you've already lit up.

Type: Gear Path Puzzle
Comment: Another easy and common HOG puzzle. Use the loops to turn the gears until you have a straight path to the goal. Here is what it looks like solved.

Type: Maze
Comment: Turn the tiles to make a path for the ants in the upper left corner to get to the bottom right corner. Here is one possible solution.

Type: On/Off Puzzle
Comment: The bonus chapter's final puzzle is a real doozy. Usually these On/Off Puzzles aren't very difficult, but this one made me want to tear my hair out. You have to get all the flowers closed, but clicking one affects others around the screen. Unfortunately, I don't have an exact solution and I can't even point you in the direction of the official guide because it doesn't cover the bonus chapter. I can give you a hint that works well for me: If the last flower that is open is in the six leftmost grouping, it is much easier to get it closed than if the last one open is anywhere to the right of those. So, I'd recommend concentrating on the right side first and working your way left. Good luck.
|


